Thursday, 28 March 2013

B&G 213 MHU unit removal

I was wondering if anyone was wanting to know how to remove the B&G 213 mast head unit?


I have seen use for two of these in only three years, the adverts say they are suitable for Antarctic weather and for 80 mph winds. In my case two news ones have failed in less than a year each, one was replaced but the second one was not.

B&G Service or self service, thats where I am at now.


So I happen to have and old one that the long arm was broken off, the screw in end will make a fine plug to blank off the mast head wire socket with when I remove the existing MHU for service, in this case the windspeed does not work (again) The fittings in the picture show the six pin socket and screw in cap.

There will also be an over center locking clip wire that further ensures the MHU does not come free.

Roy


HBYC gets the Laser Pico dinghy

This was yesterday and a number of Laser Picos were being taken down to the HBYC marina for the guys to learn how to sail them.


The guys were really excited to see what their next sailing challenge is to be.


There are a number of these boat, on loan for now.


Used but very acceptable, they will make a good step up from the O'9r class dingies the guys have been training on so far.


Those that do well and suceed in mastring the Lazer Pico can expect to be invited to next sail on JML3, which is the Lavranos L26, the class of boat used to challenge for the Lipton Cup each year!

Roy


Wednesday, 27 March 2013

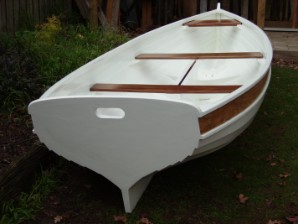
Jordan Boats rowing boat

This really is the real thing, seen donkeys years back in places like Windermere in the Lake District in England.

Now available as a design from Jordan Boats, Scotland or from CKD Boats cc in Cape Town under special licence to Jordan Boats.


Hello Roy

Herewith picture of a 15'5" T/N. Std LOA is 13'"

Regards
David

T/N stands for Tammi Norri the name of the design.

Words from Alec Jordan on the design, check out the link to view pictures on the construction method.

I cannot immediately think of any pic's of a TN13 or 15 in build.  http://jordanboats.co.uk/JB/clinker_ply.htm shows the build of the 10ft version of this line of boats, the Puffin.  This is effectively the manual for building my CP kits.  The only real difference apart from the obvious one of size is that the TN has a wineglass transom which makes cutting the bevels on the tuck a little more difficult, but should be no problem for a professional boat builder.

I think given the fact that the kit includes the moulds to build over and all the hull planks are pre cut, anyone with the will to build this boat will succeed.


The easy to set up building jig ensures you start well and can see the shape of the boat right away.


Applying the hull planks, its best to do one or two per side, then move to the other side to balance any loads caused by the ply strips.

Row or Scull, this is a nice design and will be far lighter than the traditionally solid wood planked boats that it resembles.

We have asked a local boat builder to supply a price to build this craft, either fully painted and finished, or as a bare hull you can paint out yourself.

Roy

Tuesday, 26 March 2013

A John Welsford Navigator in South Africa

There is something very special about building your own boat and then seeing it launched, will it float, will it sit to its lines, time will tell!


All pictures supplied by Wilhelm.

This Navigator was built from materials and CNC work that CKD Boats cc supplied. In this picture the side decks are still to be fitted, I guess this was done so that the painting could be done better.


Ready to sail. I remember we had those thin slats of teak in stock, just looking for a transom like this to cover, we still have some left too.


This electric  trolling motor will be nice and quiet.


Gordons Bay Harbour and light breezes to start with. Conditions picked up later to 20 knots but the Navigator handled that and a two meter swell ok, they topped ot at 8.1 knots of speed too!

Roy

Monday, 25 March 2013

B&G Network MHU 496 wire and pin changes

They may look the same but the wiring inside is changed.

Read below.

MHU 496 to B&G Network Wind repeater March 25, 2013
Having two B&G 496 mast head units in stock but with one having a broken lower
Thread where the wind speed cups fit and the other in as new condition, I had decided
To build one decent MHU from the two, excepting when the 213 PC board was changed over


Fuzzy logic often works for me, this is my sketch of each wire to connections, yours may of course be different again?

It would not work on the better mast head stalk housing, why?
Early mast head units # 496 had a different pin arrangement and a change of wire
Colour on one wire, this means you cannot take a 496 PC board from the early units
And fit in the later units.

Numbers:

Early 496-00-001-N175018 this has six wires servicing the wind speed and wind Angle
Purple,blue,green,black,red, orange.


Note the 213 code on the main PCB, this is from the earlier 213 mast head unit but the 496 MHU has a second board soldered in, so they are not a direct swop.

I decided to do a circuit test and see if the wires were connected end to end, with a meter Set to alarm, I started my test. There are six pins, where the sender fits, I used the center one as the number one, then working clockwise I checked off the other five pins, noting their colour and if the continuity was fine.


The red and yellow wires needed changing over.

I then did a sketch of each end and drew as I checked marking the number and colour, I soon had the test proven and to my surprise both units checked out fine. What was changed was one unit had a yellow wire, while the other an orange wire, which in itself is no big deal but what was also changed was that pin five had been changed to six. I was able to change these over, testing the unit when assembled gave me both wind angle and wind speed, success!


The part number on this assembly is
496-10-002

Now re assembled I have a decent 496 MHU, when tested on a spare Network Wind instument , I found the fix worked.

Maybe this simple fix will work for others?

Try this link to see what the B&G 213 MHU looks like inside

http://primus.bandg.com/icrbg/BandG%20FAQs/H2000%20FAQS/FAQ%20-%20213%20MHU%20PCB%20Swap.pdf


Roy

Pictures will follow.


Wilhelms Navigator build

The Navigator was one of the very first boats kits that were cut when Nigels large CNC machine arrived,


Hi Roy


Herewith some pictures of my Navigator, Jacqui.

I recently went for my first sail and launched her at Gordons Bay. We had a lovely day with light winds at first, but increasing to just over 20 knots. The boat proved very seaworthy. She handles the wind, choppy seas with white horses and a two meter swell with ease. Our maximum boat speed was 8,03 knots and we covered 31,3 km in the 4 hours 52 minutes at sea. We sailed 4,2 nautical miles into the bay.

Regards

Wilhem

More pic's on this super built boat tomorrow!

Roy

Sunday, 24 March 2013

Brer Terrapin, Mike takes up the story

Ruth and Mike contacted me recently about the yacht Brer Terrapin, which was the boat that introduced me to keelboat sailing back in 1976. My first transatlantic voyage was on this boat.

 
A picture I took as we sailed Brer Terrapin into Rupert Bay, Jamestown, St Helena, circa 1977, this will have been the boats third visit there by then.


Hi Roy

To clarify: I am Mike Smith, Pip Smith's brother.

I understand you were in touch with Ruth very recently in connection with her past and the ketch Brer Terrapin. I would be very happy to shed whatever light I can on the building of the yacht and hopefully to send you a few pictures, if we can find any that are suitable. Obviously in the 60's there was no such thing as digital photography, with the result that what I have - and it's not much - is on slides and if I remember correctly, they were not particularly good pics. Ruth says she has a number of photos which have been in a drawer for the last 34 years, so maybe they could be scanned.


Pip Smith, I think he is steering Brer Terrapin with his foot, we did the same!
Very briefly, Pip and I started building the yacht together in the garden of our Johannesburg home. Soon after that I got married, moved to Pretoria and ceased to take an active part in the planning and construction. My father took over and was very involved for a number of years. In the end it took almost seven years for the boat to reach the stage where all it still needed were the masts and sails. Pip was doing his medical degree and then an internship during this time so only had limited opportunities to build. It was then transported to Durban, the masts and sails ordered and fitted and he and Ruth with their one-year-old son, James lived on it for about a year. Pip then persuaded his father to join him on the trip from Durban to Cape Town where the boat remained in the Royal Yacht club until Pip, Ruth and the kid set sail for Rio.

Mikes story is below:


Brer Terrapin: 

In about 1967 my brother Pip decided that rather than spend the weekends in Johannesburg doing arbitrary things, he would like to embark on a project and have something solid to show for it. The first step was to find a suitable boat to build: With this in mind he and I went down to Durban and in the harbour saw the ketch "Ingwe", which was based on the design of a Norwegian lifeboat. We bought the plans from the owner who had himself constructed "Ingwe". We paid the princely sum of R200! Worth a lot more then of course.


The plans were drawn, most of them full size, on our sitting room floor. First to arrive was a large and very heavy chunk of Kari which was shaped, using an adze into the wooden keel. A mould was then made out of cheap wood to the shape of the metal keel. While this was being cast, the ribs at the different stations were drawn full size.


The ribs were of American white oak and the hull of planks of Sapele Mahogany three centimetres thick. The strakes were attached to the ribs with copper nails. The bow consisted of about eight layers of white oak, steamed in a homemade steam box into which steam from a boiling drum of water was fed, bent to shape and laminated.


The decking was teak, as were aspects of the cabin interior. Pip, who was studying medicine at Wits University, heard that the old medical laboratories at the university were being dismantled and refitted. He managed to pick up some really amazing teak counters for next to nothing, and with these he constructed the seating in the well where the compass was fixed and where the helmsman would sit and operate the tiller.
An exciting delivery was a large crate from the UK containing all the navigational equipment, the portholes, winches and other metalwork. Together with our father, Pip commissioned the making of two stainless steel water tanks and two fuel tanks which were placed under the seats in the cabin.


After seven years in the making and Pip's medical degree completed, Brer Terrapin was loaded onto a low loader and transported to Durban harbour. At one point on the trip, the load would not fit under a bridge on the old road to Natal. Letting the tyres down on the truck permitted the yacht to just scrape under the bridge and continue on its way. Pip, his wife Ruth and their new-born  son James spent nearly a year living on the yacht in Durban harbour while the masts were sourced and fitted and the sails made. Joined by his father and a friend, they sailed around the coast to Cape Town, a notoriously rough trip. Some time later the couple with 9 month old James set sail for Rio, stopping in at St Helena on the way.


The experience proved too much for Ruth with the responsibility of a baby aboard. Brer Terrapin was sailed back to Cape Town by another couple and it was put up for sale and after some time, sold to a Cape Town resident. Pip and family moved to Pietermaritzburg where he took a position on the staff of Edendale Hospital and bought a timber farm just outside Greytown. A few years later he died tragically.


Since then reports have surfaced of the yacht being spotted in Mauritius, California and various other locations. I understand from another blog on this site that it sank in an American port, was refloated and refitted. At the base of the main mast is a gold half sovereign.

Mike Sith.

Pip Smith with his baby son James on deck and I presume in Durban Harbour?


This is a cockpit I remember very well!


Yacht Brer Terrapin under full sail, being a ketch she also carried a Mizzen Staysail, a wonderful sail to fly if the breeze was in the right quarter.

My thanks to Ruth and Mike for supplying the words and photos but also to Justin, blog master for the HBYC as it was he who extracted many of the pictures from a zipped file for me.

Roy

Saturday, 23 March 2013

Yacht Brer Terrapin, 1967 building starts

This boat was the boat that changed my life and this is the first part of the story about how she was built and those who had a hand in her building. The quality of the build was top draw, I have no idea as to just why this was possible, given her main builder was in fact a trainee doctor.

You can find a  number of my blogs on Brer Terrapin, this was the last one.

http://ckdboats.blogspot.com/2013/02/brer-terrapin-beginning.html

The man behind the idea and the builder was Pip Smith, his brother Mike Smith was also involved from the beginning. Pips wife, Ruth was of course there from day one and its thanks to Ruth and Mike that I now have all the info on the boats story, along with a large selection of personal photographs collected by  both of them.


Ruth with her baby son James on board Brer Terrapin.


Dear Roy,

 I have lots of pics  and slides of the building of the boat (took  9 years If I remember correctly. Pip and his Dad, Gerry Smith built it from scratch) and our trip from Johannesburg- Durban then from there  sailing down the coast.... a horrific trip with gales and a savage broaching... etc  to Cape Town, Dassen Island and then on to Saldahna, , St Helena ,Rio and the Islands South of Rio. (ilha grande)  I will have to delve around in my head.....  Opening some doors that I closed long ago. But lovely to know that Brer Terrapin did so well and that she was appreciated. She was a beautiful boat and meticulously  built with great dedication and I was very involved in her creation , one way or another. I think best one day to have a chat. Anyway   we have made contact so that is a start.
with best wishes.

Ruth

Pip with his son James.

I could be wrong but that sure looks like a large South Atlantic swell in the background, I sailed across to Brasil on this very same boat.

To be continued later with lots more information and pictures.

Roy
 

Thursday, 21 March 2013

B&G Network Course computer ACP1 to ACP2?


I have featured this one before, its still a bit open ended and as I have an ACP1 but with the ACP2 dip switches I think I may be part way there?

The B&G manual says that the dip switches, 1,2,3, should be down and number 4 should be up, this sets it at 9volts.


http://www.cruisersforum.com/forums/f13/b-and-g-autopilot-47215.html

Read about the story on the Forum above.


ACP 2 board, click on the pictures to enlarge.

With not having an ACP 2 to cross check with my ACP1, I could not see otherwise if there are additions or not on the ACP2?

An ACP 2 has the dip switches, they are top right in the picture, if they are not there it has to be the ACP1 only. My ACP1 has those dip switches. Note, the dip switches change voltages from 9v to 18v.

I eye balled the boards really closely, I see no changes in the parts layout unless the values are different?


The ACP2 circuit board, brand new and never used.

Now I find an ACP 2 for sale in the USA and its brand new, they supply pictures so I can now visually cross checked my boards with the ones in the ACP2.


I find one change only, check those small four yellow blocks to the lower right hand side, they are on other parts of the board also, well mine are black instead.

I bought a whole load of the newer Network stuff in from the USA about two years back. With it came an ACP1 Network pilot control box, I have no idea if it works, I see no external faults on either of the two boards.

The one I have is ok for the smaller boats and the ACP2 is for the larger boats, I found a forum that clearly say on the early units they just changed the lables!

http://ckdboats.blogspot.com/2013/03/b-network-acp1-to-acp2.html


I sent a picture of the boards to B&G technical, they said my board was the ACP1 only.


This is what you will find when you open the box up to make your connections, the other PC boards are under an alloy cover, you need to remove four small pan headed stainless machine screws to open further.

I wonder does my unit match the ACP2?

There is one difference other than those yellow components, my ACP1 is labled for 12 volt use only, the ACP2 in these pictures is labled 12v/24v, as I need only the 12v supply I do not see this as an issue in my case.


Roy

The Hout Bay YC development sailing program

The program has been running and working well for some years now, so much so that a fund raising competition was held recently to enable two more boats to be bought.


This was the scene yesterday afternoon, the end of the series racing and all the action related with big boat racing, calls for Protest, bumps with another boat and a required 360 turn for the skipper involved, this is the real thing!


The driving force behind the program is Sam, it started with a weekly event, then expanded to sailing Monday through to Thursday, such was the interest in sailing for the local children.

The season has now closed, I will post the results when they are given to me.

Roy


Oars and Paddles in Cape Town

South African made and each one by hand.

Hi Roy

Here is a pic of some oars. I can make any size up to 6 metres.


They are made from American Poplar, which has the same weight as Clear Oregon Pine, plus
it comes in nice long lengths. We supply the waterproof PVA glue that is used.
 
Contact me for your order.
 
Roy

Tuesday, 19 March 2013

Jordan Boats of Scotland

I first spoke to Alec Jordan last year, we were discussing him supplying the CNC cut files to a customers boat for us to cut here, in the end the order did not happen.


In three years, this design a has sold over 90 kits for the St Ayles Skiff in the UK, USA, and Netherlands. Now the St Ayles is joined by the Wemyss Skiff.

Rowed here by designer Iain Oughtred and Alec Jordan


This design looks perfect for a development sailing/boating program!


We now have another Jordan Boats design enquiry and have spoken to Alec about that, watch this space for progress.

http://jordanboats.co.uk/JB/index.htm

View Jordan Boats at the link above then contact either Alec Jordan or myself to enquire about kits to their designs for South Africa.

Roy


Monday, 18 March 2013

Annapolis to Southport, Virginia, USA

This was a memorable trip down the Chesapeak Bay one October day and night, the trip was to deliver a brand new yacht to its new owners home port.


The Alueala 38

Map showing the lower portion of the Chesapeak Bay.
The route was the full length of this chart, plus about the same again on the next chart. Annapolis is off this chart and on the left, while Southport and Norfolk are near the bottom,also on the left side and before the very long road traffic bridge which is at the entrance to the sea.


Charlie was the owners friend and ran a boat yard near the marina they would keep the boat at. Thats the owners wife trying to warm up in the weak October morning sun. Charlies card says C.A.Bartlet, Lees Yacht Harbour, 3101 West Norfolk Road, Portsmouth, VA. 23703. (does that exist now?)


Arrival early morning, thats Norfolk and Southport ahead.


Norfolk, Virginia, USA, in 1977 thats where they mothballed ships, mainly US Navy but also the SS United States , the sailing ship Atlantic was also to be found and as a hulk if you knew where to look, Charlie did!


Cheers, this dram of whiskey went down really well that morning, we had done some 125 miles in around 24 hours.

The guy with the black cap is the new owner, a local doctor who had a home on a beach front. Next to him in the red/brown coat is Chris of Sarno Associates, the selling broker. The guy in the woolie cap was a friend of the owner, it was he who gave me a room for the next week and also loaned me a BMW to drive during that week.

How nice was that!

Roy


Sunday, 17 March 2013

Mast building glues

This is the basis for a thread on a subject that needs discussion from time to time.
There are lots of pictures that I will load in the next day or so but this is the start.

Do it yourself has always appealed to me, just ensure you study the various processes well. Dudley Dix is still designing masts and spars in wood, some of his designs such as the Didi 38 and Didi 26 include the mast design as part of his plans package. He may
be able to do you a design for your own boat?

A story I wrote on mast building can be found in the link below.

Below is the link to a story I did on the subject.

http://www.duckworksmagazine.com/06/howto/birdsmouth/index.htm

This is a sister ship to the design we are talking about a mast for. The place was the Annapolis Boat Show and in October 1977.


Alajuela 38

Picture by R McBride using a Canon FT film camera.

I will add the brokers name in the morning when I have found his card!

His name was/is Christopher Vaile, broker and of Sarno Associates .Marblehead, Massachusetts, 01945.

Chris told me that the boat was his and bought in as a dealer buy in some time back, he was keen to sell it on and worked hard to ensure it stayed in the perfect condition I saw the boat in. My interest in this boat was the fact that she was a sister ship to the Ingrid 38 I had sailed across the South Atlantic a few months before.

With this boat being in GRP the internal space was a whole lot more than Brer Terrapin, the yacht I had sailed on, built in wood, Sapele Mahogany on Amrican Oak frames, she was smaller inside by as much as 250mm?

I will also post a picture showing the delivery crew after arrival in Portsmouth, it was a 24 hour trip and about 125 miles in all.

The place is the Annapolis Boat Show, October 1977, I was asked by the boats broker to act as a watch captain on the delivery down the Chesapeak Bay and to the boats new owners home port in Portsmouth, just opposite Norfolk in Virgina, USA.

Hi Roy ,

I have read your page on mast building with interest. We have tried to research for our project but have only found yourself, the ‘Pardeys’, a local ship wright and Collars in england who seem to discuss the subject much. We are about to embark on building a 60’ mast for our Alajuela 38, a Colin Archer inspired hull.


We are building it in the states and have been able to source Sitka Spruce. we have not sourced any glue yet but were intending to use resorcinol, aerodux 500 if possible. We’re not sure of whether to trust the american resorcinols such as the Dap product, wondered what suggestions you might have, it also comes in 2 parts, resin and powder.


Also we are getting alot of bemused criticisms from people dumbfounded as to why we’re not using epoxy, hoped you might expand on your reasons, ours so far are the lack of penetration, uv resistance wonder about it’s flexibility? We don’t know how much glue we are likely to use so would really appreciate a pointer for this. We intend to construct the mast as follows: front and back pieces will be 5 1/2 “ wide by 1 7/8 “ deep sides 6 1/4 “ by 1 1/4 “ there will be a small channel protruding from the sides in to the front and back pieces to stop movement on the gluing stage. scarfs will be 1 / 12 so near enough 2 ft long, there will be 4 scarfs on each of the four parts of the mast. Our friends here worry about the staining of the glue, as we intend to varnish the mast, also we worry about the lack of gap filling capability of resorcinol, though we want to use it we’re going to have to make our joints very accurate and clamp it all up quite quickly.


The wood is clear Sitka Spruce, know for its light weight, the sections need to be larger than would be used when using clear Douglas Fir / Oregan Pine due to the latter being stronger.

We’d really appreciate any indications or insights you might have for our project.


We have your phone number and may phone you if that is ok.


http://www.impetuoustoo.blogspot.com/


Thanks for your attention,


Duncan and Ruth


PS, if you’re interested you can google earth 3911 Liggio st dickinson texas you can see our boat before we started restoring her!

My thanks to Ruth and Duncan for the use of their mast building pictures.

Roy.

A reply from Dudley Dix on the subject came back by return.

From: Dudley Dix [mailto:dudley@dixdesign.com]
Sent: Saturday, March 16, 2013 1:47 PM

To: Roy; 'Ruth Evans, Duncan Fagg'

Subject: Re: CKD_website_enquiry

http://boatbuilder-tips.blogspot.com/2013/01/plywood-matters.html

Read up on the subject of glues and plywoods in Dudleys own blog.
Hi Ruth,

I have intended to write about glues on my amateur boatbuilder tips blog but have not yet had the time to do so. I covered it a bit when discussing plywood at http://boatbuilder-tips.blogspot.com/2013/01/plywood-matters.html .

I have used Aerodux 500 and the resin/powder varieties. Although I haven't used the DAP version, I don't expect it to be much different from the one that I used in South Africa. Sorry, the name escapes me although I clearly remember the smell and the look of the can. I had equal success with both types and would have no reservations about the DAP version. The Aerodux version uses the same chemicals but the hardener powder is mixed into a resin instead of being in dry form.

I think that the proper curing of the glue is more certain with the resin/powder version than the resin/resin version. I found that the resin hardener separates out no-matter how diligently you stir it up before measuring, with the filler settling to the bottom. The result is that toward the end of the cans you are getting progressively more of the filler in the mix. In balance, the powdered version is more difficulty to quickly measure out quantities like one can with two liquids. Accuracy needs measurement with an electronic scale. Despite that, I have never heard of a resorcinol failure and have myself had numerous epoxy failures.

Resorcinol is described as having low gap-filling properties but I have not found it to be bad. The main difference is that it penetrates into the wood better than epoxy so you must be liberal when applying it, particularly if the joint will be open for awhile. For a mast, apply it thick with a brush. It also starts to develop a skin on the surface, whereas epoxy starts to cure without forming a skin. The skin is not a problem because it will dissolve as you bring the two glue-covered surfaces together but you need to be aware of it and don't let it become more than a very light skin before closing the joint. A mast is the sort of project where it is useful to have a few friends to help with the assembly of the mast, for the primary reason of getting it clamped up fast while the glue is wet on the bonding surfaces. Don't take a shortcut and apply the glue only to one surface, it must be on both surfaces.

As for the dark glue lines showing on your clear-finished mast, I ask so what? It is more important to have a structurally sound mast than to have one built from the wrong glue just to hide the glue lines. You are not trying to make a blemish-free air-brushed faux-wood mast that is actually carbon fibre under the wood look. You are making a wooden mast, with all of the joints that method implies. Embrace the look of the mast and the fact that you can see how it was constructed. It becomes part of the character of your traditional boat and something to show off and talk about. Don't try to hide what it is. I suspect that the friends whose opinions worry you are mostly owners of boats that are much more modern and faceless in their image. Their opinions are not important, you are the ones who need to be happy what you are doing.

Regards,

Dudley Dix

Dudley Dix Yacht Design
1340-1272 N Great Neck Rd #343
Virginia Beach, VA 23454, USA
Tel (757)962-9273 Fax (888)505-6820

Email dudley@dixdesign.com

Website http://dixdesign.com/ & Mobile website http://m.dixdesign.com/

Blogs http://dudleydix.blogspot.com/ & http://boatbuilder-tips.blogspot.com/

Facebook http://facebook.com/DudleyDixYachtDesign/

http://psoriasis-spot.blogspot.com/

Some mistakes are too much fun to make only once