Saturday, 22 March 2014

British Seagull 5hp with a new finish

The Seagull engine in question looks to have never run in salt water, it was very second hand when delivered though.


Now such engines are made from good materials and given we can take them apart to the last nut and bolt if required, refinishing to as close to new is possible.


The flywheel cover will be sprayed with new gold in a hammer finish.


This work is not unlike restoring a classic car it takes time, lots of time, plus the parts have to be imported, Cape Mail stopped the parcel, then levied duty plus the normal 14% Vat of course.


So here we are, the main body and power train is rebuilt, its the fuel tank next and that has to be cut into three parts to enable it to be reshaped and allow the new solid brass threaded insert to be Silver Soldered in, thats expensive stuff, then again this is that kind of restoration.
Just the hammered gold paint on the flywheel cover and the rebuilt fuel tank to add now.

Hint, keep your restored British Seagull outboard working well and looking clean by running it in fresh water and then cleaning it down with some Teepol Orange (clear)  pure soap, then rinse with clean water.

Roy
 
The outboard as it looked on arrival!
 
 
The engine will not have run in years?
 
 
 Dirty and the tank filler is wrecked, the parts were mainly intact otherwise, you can see why a total strip down was required.
 
A message in from my parts supplier.

Must say the Seagull looks as close to original factory condition as any I have seen, well done!

Regards,

John

How to assemble a 5hp British Seagull outboard

The diagrams I have give an indication as to what goes where but so many models seem to use other parts and its not altogether clear what fits what or where? We have fitted the 25:1 petrol to oil conversion kit to the carburetor, the original mix was 10:1 so prone to smoking?


With Friday being a public holiday in South Africa I used the free time to sort this lot out, click on the picture to enlarge.


We now hold stocks of the correct 140 grade of gear oil.


Parts have been re chromed and really do look correct now.


The main assembly is back together, the clutch works again, all that remains is to fit the propeller, the mounting clamp, carburettor, handle and control, plus that petrol tank with its gaping hole once repaired.

How easy will that be, time will tell?

Roy

We have a similar British Seagull 5hp engine which was serviced and fitted with new parts as required, its for sale, restoration can be done if required. The engine has never been used in salt water and is in great condition, contact me for pricing.

How to assemble a Mirror Dinghy from a CNC cut kit

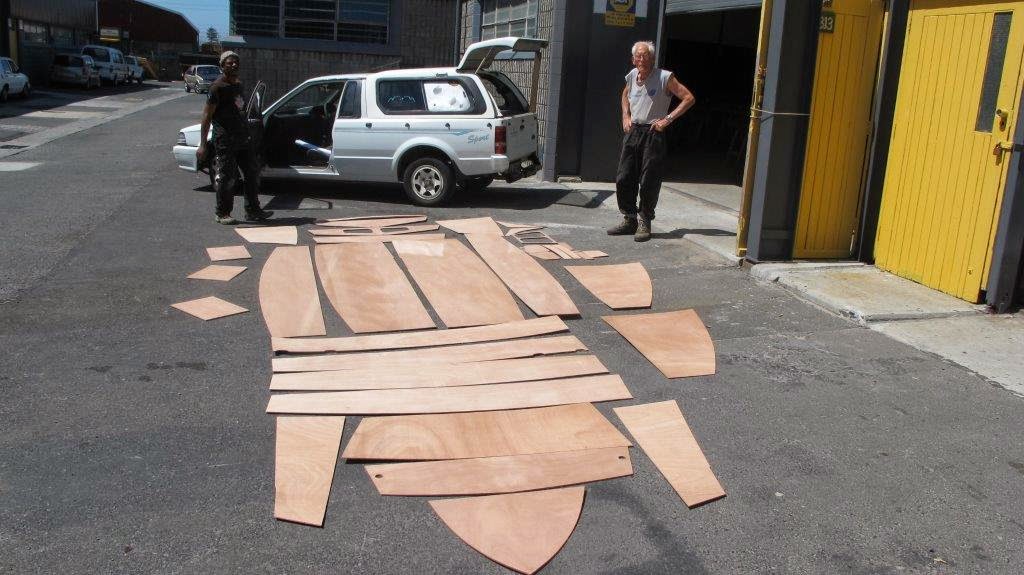
This may be the same from a hand or electric jig saw cut kit but Peter the boat builder was very happy with the panel fit and how easy the hull went together. Check how well the bulkhead in the picture fits.

With the actual hull dry assembled with copper wire, Peter then applied a mix of epoxy , micro balloons and fumed silica between the copper wire.


Note how clean and smooth the center line joint is when the copper wire has been removed.The dagger board case has not been fixed in position yet.


The deck and seat panels fit well ( I have the foredeck upside down!)


This is a larger boat than I expected but Peter tells me it has turned out to be a  pleasure to construct.
With regards to the size, the Mirror is 10' 11" long but check the chopped off pram dinghy bow, is we extend the sides forward we really have a 13' 6" inch boat!


The decks and seats will all be bonded in next week and we will then have the very first CNC cut Mirror assembled and ready to trim out.

Once measurements are prooven we can accept your orders for both kits and completed boats, on a first come first served.

This boat will be sold unpainted unless you want it finished.

More next week

Roy


Friday, 21 March 2014

Google Earth is watching you

Well I have to assume its Google Earth, it may be the Cape Town City Council also?

Seen yesterday and in the Alphen to Constantia areas.


Click on the picture to enlarge it.

This is not too bad a picture when we consider the camera is my now old Canon G11 which has the well known fault of scratches on the lens, yes a bad design fault for sure. I went to telephoto as the Honda CRV was moving away from me, the windscreen of my Ford LDV seems not to be there?

The Eyes Have It, or is that us?

I think the gear was active as a spinning wheel could be seen on the top of the rig.

Big Brother or was it Little Sister?

Roy

Note, if your home, car or person is found on Google Earth and you have an objection, you can request them to degrade the image, you can also ask them to correct a position based on a postal code if the building indicated is to be seen out of position. I have done this myself and later found the marker was placed in the correct position.


Thursday, 20 March 2014

Impressions magazine competition now open!

I am not sure if none Imp Club members can enter this competition but why not give it a try?

www.theimpclub.co.uk

None members are welcome to try on a fun basis.

Taufeeq lifting  and Saleem watching.


One from me, how about " The worlds first light car" ???

The model is a 1971 Hillman Imp Deluxe.


Roy

Mirror Dinghy progress on our CNC kit assembly

I spoke to Peter the boat builder yesterday, progress sounds good and I will see him later today, so pictures of the Mirror Dinghy build then.

I think he has been fastening the pine cleats to the bulkheads and seats?


This was just one week back, the hull panels were put together two days later!


It was easy says Peter.

At this stage the copper wire has been removed after the epoxy paste fitted into the hulls ply joints was cured, this leaves a nice clean surface on which the glass tape will be epoxy fitted later.


Check the pine cleats which are fitted first.

Kits and part or fully built Mirror Dinghy's to order.

Roy

Wednesday, 19 March 2014

Exide battery charging on a Singer Chamois

The 1967 Singer Chamois is kind to batteries, the Lucas  generator only puts out 20amps but for normal driving use and including using headlights this is fine.


The battery is a couple of years old, more maybe? I have never checked the fluid levels as modern batteries seem not to need this?  The car is used on a weekly basis but not for great distances, I allow the engine to reach a decent warm up and by the time I put the car away the heater is working, this in an Imp tells  you that the water has circulated and arrived at the front of the car.

 
The car normally starts first time and even after a week or two when I have not driven it. Recently I have detected that the battery was not quite as strong as normal, time to check the fluid levels? I removed the battery and sure enough the fluid levels were well down, topped up and with a fairly clever charger on I was pleased to see that the charge came up to a decent level.
 
 
The battery fits on the right hand side of the engine bay, looking inside it to check the fluid levels is not that easy, so removal of the battery was the better idea.
 
Its worth checking the battery levels?
 
How easy is that!
 
Roy
 

Tuesday, 18 March 2014

Ship in a bottle, from St Helena Island

Ok its really a yacht but I guess its fine for me to use the normal term of ship?


The year was 1977 and we were four up on the Ingrid 38 yacht  by William Atkin, the yacht was Brer Terrapin. My bottle has since been back to St Helena and on the yacht Ocean Cloud, then onto Salvador, Bahia, Brasil and then as far as Venezuela and Trinidad  before sailing all the way back to Hout Bay, near Cape Town in South Africa.


Click on the picture to enlarge it.

In 1977 and when we arrived at St Helena Island after 13 days sailing time from Cape Town, a guy offered to do us a copy of our yacht sailing in a bottle, the price was about eight Pounds? the deal was we had to also supply the bottle and preferably still full of brandy?

This was one of two we had made, Dennis the skipper and yachts owner had the other one. Sadly the guy had passed on when I next sailed to the island, so Ocean Cloud never had one made.

Facebook has just posted another one but of the yacht Rainmaker which Michele still has, she and her husband Peter, both ex Durban are now in Australia.

The book Cape Towns Traditional Boat Association was a good seller, some copies are still available, contact me to buy a copy, now just R135 per copy plus postage.

All sales income go to Station 8  NSRI here in Hout Bay.

Roy

Monday, 17 March 2014

Yaesu FRG 7700 audio and mode pot fault fix

A while back and in July 2012, I asked Sam of Yaesu UK to send me a new audio pot for the Yaesu FRG7700 communications receiver. It got lost in the post and ended up being returned in its unopened package and back to the UK.

Its here now (thanks Dion)  but unused, as checking on Google I found a method to try to fix it which worked 100% and without removal of the pot. The fault then was the sound was either all on or mainly off, it was hit and miss as the knob was turned.

I had a look on Google and found a guy who used a thin oil to lubricate the back of the audio control which fixed the problem, I tried the same fix and it worked.


This set has the optional FRT 7700 tuner and memory pack on the rear of the set.

http://www.youtube.com/watch?v=ZrtN5dkvIEY

Check the link, its simpler that one would think to service this radios faults.


The original brochure came from Hamrad in Cape Town, back then the set was R529.20!


The manual tells me that the three positions on the Mode switch are selective for the AM bands, M being the normal choice when station signals are strong, for sure the audio is far clearer on that position.


I have owned this Yaesu FRG7700 at least twenty years, my old pal Willie (r.i.p) sold it to me after his last transatlantic crossing on his Lello 34 named Bucaneer.

Yesterday I got to thinking the same fix on the Mode pot may work also?

Check the link, its the same fault issue as the one my set had, note I say had!

After servicing of the two pots mentioned and tuning in to Cape Talk 567 I find the reception to be sparkling.
Also check the back of the set, you will find a black slide switch with Local and DX below and above it, squirt some thin lubricant into that switch also, you audio may increase just because of that.

For normal listening use the DX position.

I also see a posting saying that if your FRG7700 set has a serial number starting with 1H the set is dated August 1981, mine has a serial number starting with 2H1 (willie wrote this on the service manual) so is the set in the pictures later? They stopped production in 1982??

Roy

About 2018 the set died, went silent, no display now sound, nothing, I put it away on a shelf, then a few days back I got it out again, bought some circuit cleaner, sprayed all the knobs and guess what, success.


This fix may be of interest to many of the groups members, as what worked on my radio receiver may well work on receiver amplifiers also?
I have had a Yaesu FRG 7700 radio receiver for at least thirty years, I was the sets second owner, it came of a yacht that belonged to a friend of mine who had done at least two transatlantic crossings with the set.
In 2012 the audio knob had an issue, either all on or all off, thinking that the fault was the audio / tone control knob I imported a new one from England, before fitting it I tried a squirt of thin oil into the back of the control, it may have been Q20? the audio volume level then worked and the new one was never fitted.
A year back the set died, it just went silent, nothing at all to be heard, excepting when the power button was pressed a soft sound could be heard as the power went into the PCB.
I could have the set seen to by a radio specialist, however his hourly fee would soon pass the value of the set, I had an idea to see what an application of circuit cleaning fluid would do first?
The can of fluid cost me R139, its imported so far from cheap, say U$10.00 which I guess is cheap when you think about it?
I opened the set, sprayed all the control knobs as best as I could, the silence continued, I thought at the time "oh well nothing ventured nothing gained " as they say?
A while later I switched the set on and it came to life and with so much volume that I near fell off my chair, the set is fine now, audio and tuning all work.
Recomended, next I need to install new light bulbs in the SWR meter and tuning dial.

Sunday, 16 March 2014

A British Seagull outboard world first?


This is the week of world firsts for us it seems?

We started with the first Mirror Dinghy CNC cut kit, now its the very first British Seagull petrol tank filler neck we have had made.


The 1971 5hp British Seagull we are restoring arrived with a fuel tank that was seriously battered, the ends are both pushed in and the filler neck was missing, it had what looked like a cars radiator filler cap brazed in place instead.

Why is this a world first?

Well our regular British Seagull parts supplier in the UK, says that this filler neck was not listed on the official  parts list and has never been asked for in the 25 years he has been selling British Seagull parts!


We have a very talented  local engineer who was able to machine a new neck to match the original  type petrol cap he was supplied. The price? I did not dare ask, we can ship worldwide if your wanting one?


The new neck nearly closes off the hole.

The tank needs both ends cutting off for re shaping, the hole will be closed from the inside when thats
being done, we need silver solder, expensive!

How easy a fix will this be, I have no idea........


Roy